
ERC-20 Token Contract(2/2)
지금부터는 사실 스마트 컨트랙트와는 크게 관련이 없다. 하지만 블록체인과 웹을 어떻게 연계하는 문제는 애플리케이션 개발에서 관심을 가질 만한 부분이긴 하다. 여기서는 고전적인 방식, 그러니까 브라우저 스크립트 형태로 간단한 웹페이지를 구현해보도록 한다.😁
화면 개발
Truffle box 중 하나인 TutorialToken 예제는 자바스크립트 기반으로 구현되어 있으며 다음과 같은 라이브러리들을 사용하고 있다.
- jquery.min.js
- bootstrap.min.js
- web3.min.js
- truffle-contract.min.js
처음 두 개는 자바스크립트에서 자주 쓰는 것이므로 익숙할 것이다. web3.js는 이더리움의 자바스크립트 라이브러리라고 보면 된다.
특히 truffle-contract.js는 Truffle 컴파일 결과물을 자바스크립트에서 사용할 수 있도록 해주는 라이브러리이다.
테스트 웹서버로 lite-server를 사용할 것이다. FooToken 폴더에서 다음을 실행한다. 그리고 웹 리소스들을 넣을 WebContent라는 폴더를 만든다.
npm init
npm i lite-server --save-dev
그리고 bs-config.json 이라는 파일을 다음과 같이 만든다. 이 파일에는 lite-server가 바라보는 디렉토리들을 지정한다.
{
  "server": {
    "baseDir": ["./WebContent", "./build/contracts"]
  }
}
그리고 package.json를 열어서 lite-server를 실행할 수 있도록 scripts에 “dev” : “lite-server” 을 추가한다.
{
  "name": "footoken",
  "version": "1.0.0",
  "description": "",
  "main": "truffle-config.js",
  "directories": {
    "test": "test"
  },
  "scripts": {
    "dev" : "lite-server",
    "test": "echo \"Error: no test specified\" && exit 1"
  },
  "author": "",
  "license": "ISC",
  "devDependencies": {
    "lite-server": "^2.4.0"
  }
}
준비된 디렉토리는 아래와 같을 것이다.
C:\Users\foo\FooToken
Mode                LastWriteTime         Length Name
----                -------------         ------ ----
d-----     2018-06-10   오후 2:11                .idea
d-----     2018-06-10   오후 3:31                build
d-----     2018-06-10  오전 11:46                contracts
d-----     2018-06-10   오후 3:30                migrations
d-----     2018-06-10   오후 3:40                node_modules
d-----     2018-06-10   오후 2:15                test
d-----     2018-06-10   오후 6:08                WebContent
-a----     2018-06-10   오후 4:14             75 bs-config.json
-a----     2018-06-10   오후 3:40          80201 package-lock.json
-a----     2018-06-10   오후 4:16            339 package.json
-a----     2018-06-10   오후 8:49            259 truffle-config.js
-a----     2018-06-10  오후 12:03            259 truffle.js
WebContent 폴더에는 bootstrap-4.0.0의 css와 js 파일을 복사한다. js 폴더에는 web3.min.js 와 truffle-contract.min.js도 함께 복사해서 넣는다. 그리고 index.html을 만들어 둔다. 완료된 폴더 내용은 아래와 같다.
C:\Users\foo\FooToken\WebContent
Mode                LastWriteTime         Length Name
----                -------------         ------ ----
d-----     2018-06-10   오후 3:58                css
d-----     2018-06-10   오후 4:13                js
-a---- 2018-06-10 오후 6:08 3617 index.htmlC:\Users\foo\FooToken\WebContent\js
Mode LastWriteTime Length Name
---- ------------- ------ ----
-a---- 2018-06-10 오전 3:29 195855 bootstrap.bundle.js
-a---- 2018-06-10 오전 3:29 326634 bootstrap.bundle.js.map
-a---- 2018-06-10 오전 3:29 67742 bootstrap.bundle.min.js
-a---- 2018-06-10 오전 3:29 273872 bootstrap.bundle.min.js.map
-a---- 2018-06-10 오전 3:29 115048 bootstrap.js
-a---- 2018-06-10 오전 3:29 195373 bootstrap.js.map
-a---- 2018-06-10 오전 3:29 48944 bootstrap.min.js
-a---- 2018-06-10 오전 3:29 161998 bootstrap.min.js.map
-a---- 2018-06-10 오후 4:12 340690 truffle-contract.min.js
-a---- 2018-06-10 오전 9:45 141091 web3.min.js준비가 거의 된 것 같다. 토큰을 송금하기 위해서는 앞에서 개발한 스마트 컨트랙트 FooToken.sol의 transfer 메소드를 호출해야 한다. 그런데 이더리움에서 트랜잭션은 Gas 비용을 지불해야 한다. 그러니까 “지갑”에 “이더(ETH)”가 있어야만 메소드를 실행시킬 수 있다(반면에 조회성 메소드는 공짜이다).
이더리움 지갑 소프트웨어로 MetaMask를 사용할 것이다. MetaMask는 잘 알려진 이더리움 웹 지갑으로 크롬의 플러그인 형태로 동작한다. 미리 크롬 웹스토어에서 MetaMask를 설치하도록 한다.
MetaMask를 설치한 후에 로컬의 Ganache에 연결할 것이다(Ganache를 종료했다면 다시 실행해야 한다). 그림과 같이 상단의 Network를 클릭하고 Custom RPC 를 설정하면 로컬의 Private Network로 연결된다.
🔔 2018년 11월, 현재 메타마스크는 5.x로 업그레이드 되어 그림과 다를 수 있으나 기본적인 설정은 동일하다.
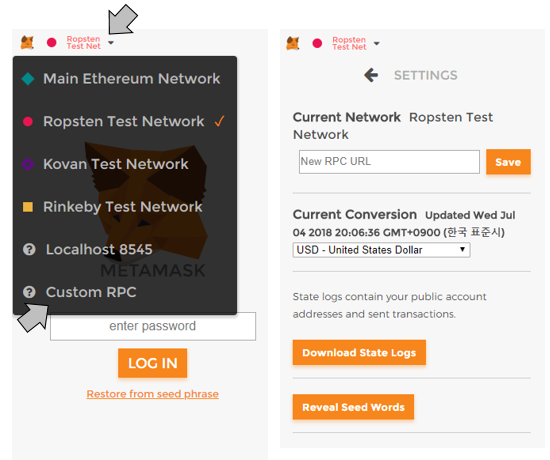
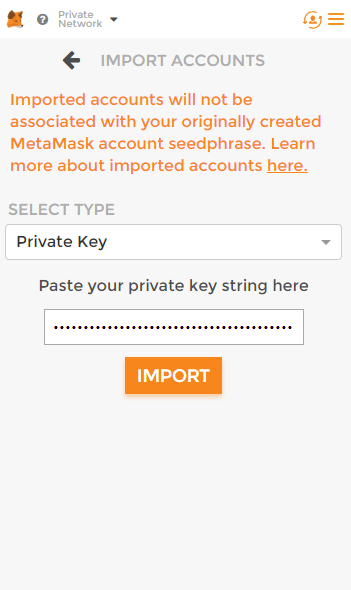
Ganache에 연결한 후 미리 생성된 계정 10개 중에 accounts[0]의 Private key를 복사하여 MetaMask에 계정을 IMPORT한다.

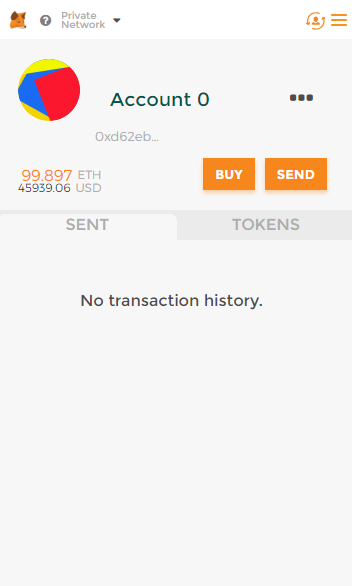
최종적으로 다음과 같은 화면을 볼 수 있다. Ganache의 자동으로 생성해준 첫 번째 계정의 잔액이 나온다. 계정 이름은 “Account 0”로 바꾸었다.
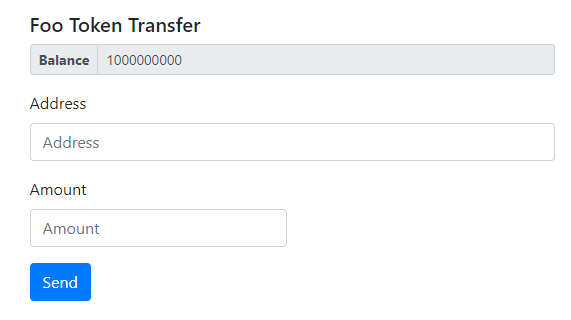
이제 웹 페이지를 디자인한다. 만들려고 하는 최종 화면은 다음과 같은 형태이다.
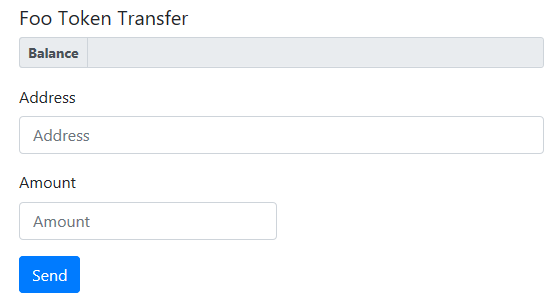
이 화면을 index.html에 작성하기로 한다. 내용은 아래와 같다.
<!DOCTYPE html>
<html lang="en">
<head>
<meta charset="UTF-8">
<link rel="stylesheet" href="css/bootstrap.min.css">
<script src="https://ajax.googleapis.com/ajax/libs/jquery/3.3.1/jquery.min.js"></script>
<script src="js/bootstrap.min.js"></script>
<script src="js/web3.min.js"></script>
<script src="js/truffle-contract.min.js"></script>
<title>Foo Token</title>
</head>
<body>
<div class="container mt-lg-3">
<div class="col-6">
<h5>Foo Token Transfer</h5>
<div class="input-group input-group-sm mb-3">
<div class="input-group-prepend">
<span class="input-group-text font-weight-bold">Balance</span>
</div>
<input type="text" readonly class="form-control" id="tokenBalance">
</div>
<form>
<div class="form-row">
<div class="form-group col-md-12">
<label for="inputAddress">Address</label>
<input type="text" class="form-control" id="inputAddress" placeholder="Address">
</div>
<div class="form-group col-md-6">
<label for="inputAmount">Amount</label>
<input type="number" class="form-control" id="inputAmount" placeholder="Amount">
</div>
</div>
<button type="button" class="btn btn-primary" id="btnSend">Send</button>
</form>
</div>
</div>
<script>
var contracts = {};
var web3Provider;
var web3;
$(function() {
if (typeof window.web3 !== 'undefined') {
// This user has MetaMask, or another Web3 browser installed!
web3Provider = web3.currentProvider;
web3 = new Web3(web3.currentProvider);
$.getJSON("FooToken.json", function(data) {
//Get the necessary contract artifact file and instantiate it with truffle-contract.
var FooTokenArtifact = data;
//console.log(FooTokenArtifact);
contracts.FooToken = TruffleContract(FooTokenArtifact);
//Set the provider for our contract.
contracts.FooToken.setProvider(web3Provider);
getBalances();
});
} else {
}
$("#btnSend").click(function(){
var amount = parseInt($("#inputAmount").val());
var toAddress = $("#inputAddress").val();
web3.eth.getAccounts(function(error, accounts) {
if (error) {
console.log(error);
}
contracts.FooToken.deployed().then(function(instance) {
return instance.transfer(toAddress, amount, {from: accounts[0], gas: 470000});
}).then(function(result) {
alert('Transfer Successful!');
getBalances();
}).catch(function(err) {
console.log(err.message);
});
});
});
});
var getBalances = function () {
web3.eth.getAccounts(function(error, accounts) {
if (error) {
console.log(error);
}
contracts.FooToken.deployed().then(async function(instance) {
var bal = await instance.balanceOf(accounts[0]);
//console.log(bal);
$("#tokenBalance").val(bal.c[0]);
});
});
};
</script>
</body>
</html>먼저 결과부터 확인해보도록 하자 FooToken 폴더로 이동하여 lite-server 를 실행한다.
npm run dev크롬에서 http://localhost:3000 으로 연결하면 index.html이 열리면서 MetaMask가 “인젝트”된다(Injected Web3). 그리고 토큰 잔액 Balance가 10억으로 표시되면 일단 성공이다! 🥁
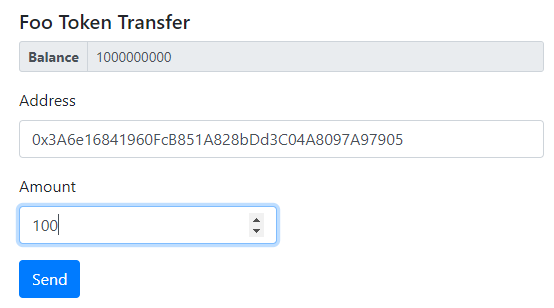
이제 이 화면을 통해서 두 번째 계정 accounts[1]에게 토큰 100개를 전송하기로 한다. MetaMask에 IMPORT한 계정은 토큰 10억개를 소유한 accounts[0]이기 때문에 토큰을 다른 계정에 전송할 수 있을 것이다. Send를 눌러보자.
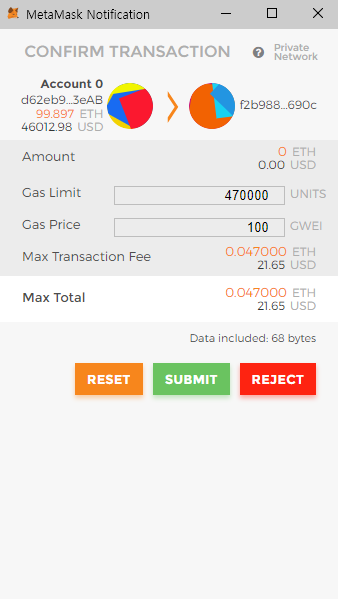
Send를 누르면 MetaMask가 다시 뜨면서 수수료(Gas price)를 입력하라고 한다. 여기서는 100 GWEI로 나오는데 그대로 내기로 한다. SUBMIT을 누른다. 0xf2b988…690c는 바로 FooToken 컨트랙트 주소임을 알 수 있다. 즉 EOA(Externally Owned Account)인 accounts[0]가 CA(Contract Account)인 FooToken 컨트랙트의 메소드를 실행하는 것이다.
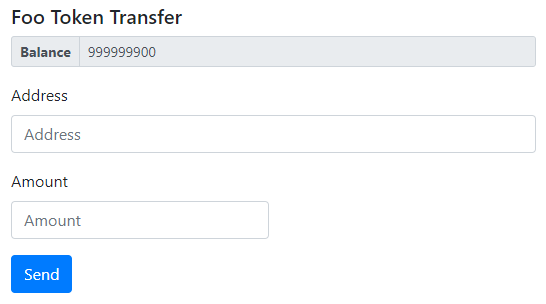
웹 페이지를 새로 고침하면 토큰의 잔액이 100만큼 줄어들었음을 알 수 있다. 100 FOO는 accounts[1]에게 전송되었다.
accounts[1]의 FOO 토큰을 truffle console에서 확인할 수 있다.
PS C:\Users\foo\FooToken> truffle console
truffle(development)> var foo = FooToken.at("0xf2b988a35D6a7A3bfD08235Eb1AA4775B14C690c")
undefined
truffle(development)> foo.balanceOf(web3.eth.accounts[1])
BigNumber { s: 1, e: 2, c: [ 100 ] }
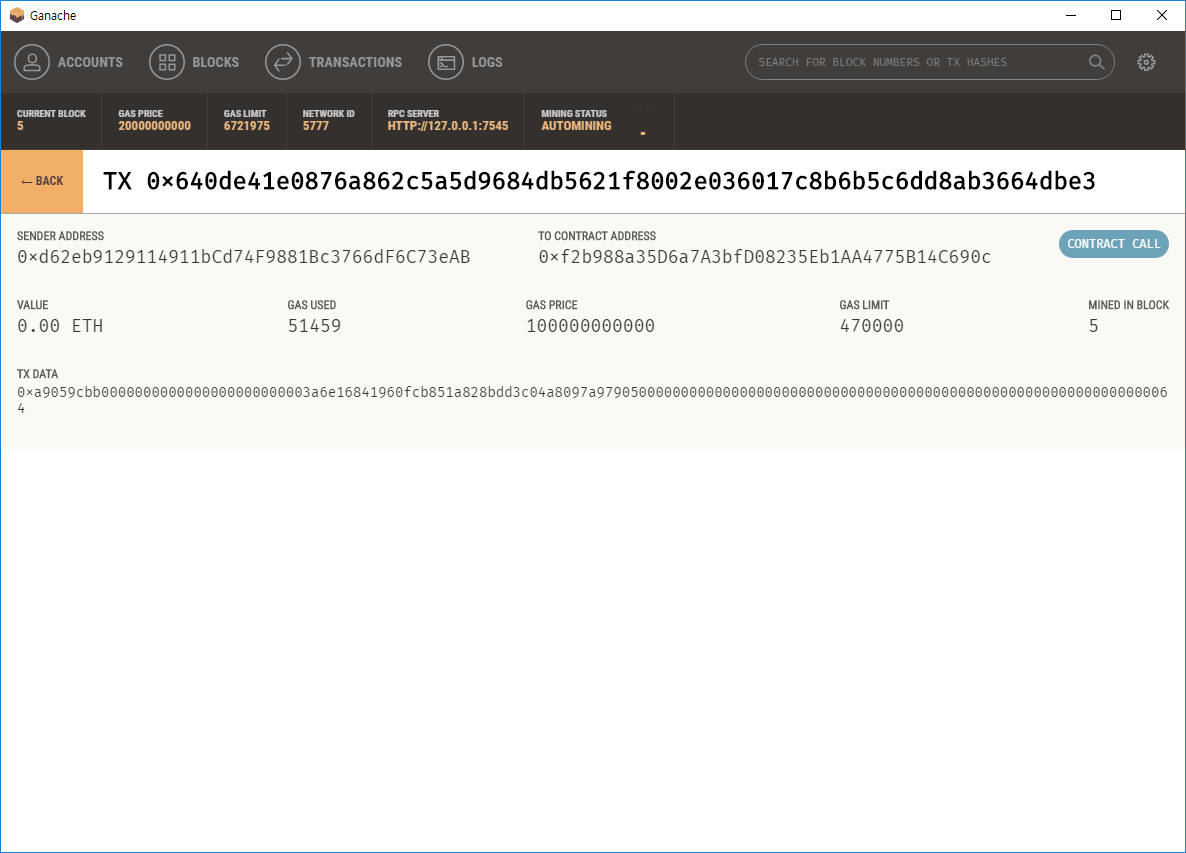
truffle(development)>Ganache에서 트랜잭션 정보를 살펴보자. 실제 사용된 Gas는 51,459이다.
Injected Web3
MetaMask와 연계되는 부분, 이것을 “Injected Web3”라고 하는데 웹페이지가 열릴 때 다음 스크립트가 동작한다.
if (typeof window.web3 !== 'undefined') {
    // This user has MetaMask, or another Web3 browser installed!
    web3Provider = web3.currentProvider;
    web3 = new Web3(web3.currentProvider);
애플리케이션에서 스마트 컨트랙트와 상호작용하기 위해서는 ABI가 필요하다. Truffle은 컴파일한 결과(artifact)를 ./build/contracts/FooToken.json 으로 생성한다. 이것을 이용하기 위해 truffle-contract.js를 사용한다.
$.getJSON("FooToken.json", function(data) {
// Get the necessary contract artifact file
// and instantiate it with truffle-contract.
var FooTokenArtifact = data;
//console.log(FooTokenArtifact);
contracts.FooToken = TruffleContract(FooTokenArtifact);
// Set the provider for our contract.
contracts.FooToken.setProvider(web3Provider);
getBalances();
});Send를 누르면 컨트랙트의 transfer 메소드를 호출해야 한다.
$("#btnSend").click(function(){
var amount = parseInt($("#inputAmount").val());
var toAddress = $("#inputAddress").val();
web3.eth.getAccounts(function(error, accounts) {
if (error) {
console.log(error);
}
contracts.FooToken.deployed().then(function(instance) {
return instance.transfer(toAddress, amount, {from: accounts[0], gas: 470000});
}).then(function(result) {
alert('Transfer Successful!');
getBalances();
}).catch(function(err) {
console.log(err.message);
});
});
});비동기 호출이기 때문에 .then 또는 async/await 등을 사용해야 하는 것에 주의한다.
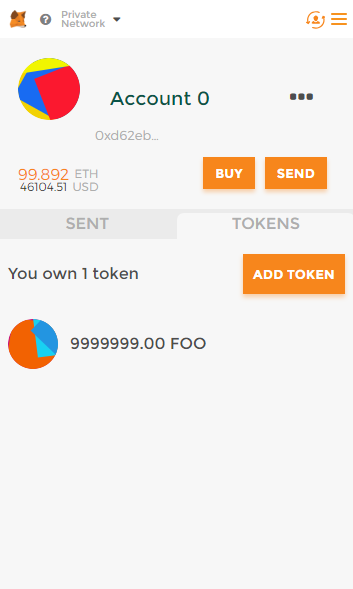
MetaMask 토큰 탭에서도 토큰 잔액 확인이 가능하다. decimals = 2 이기 때문에 토큰 잔액을 100으로 나누어 표시된다.
Crowdsale 컨트랙트
이 예제에서는 토큰을 무료로 전송해 주었지만 실제로 이렇게 주는 경우는 없을 것 같다. 예를 들어 1000 FOO를 1 ETH에 판매하는 형태로 토큰을 배포할 것이다. 물론 FOO 토큰이 미래에 어떤 가치를 기대하기 때문에 가치를 지닌 코인, ETH를 지불하고 토큰을 구매하는 것이다.
이를 위한 스마트 컨트랙트가 토큰 바로 크라우드 세일(Crowdsale) 컨트랙트이다. 당연히 FooToken.sol 과 함께 동작하는 컨트랙트가 될 것이다. 컨트랙트와 컨트랙트의 상호작용을 살펴보는 것도 스마트 컨트랙트의 기능을 이해하는데 도움이 될 것으로 생각한다. ✨